5 Insta-worthy Home Photography Tips
Want to know how to shoot and edit Instagram-worthy photos of your home? With the technology we have now, you don’t need a whole studio set-up just to shoot professional photos. Instead, discover simple photography tips like low angles, natural lighting, and more! No 5-star setup, advanced skills, or professional photographer needed. Learn how to photograph your home with these five simple tips and tricks!
1. Know Your Lighting
Products Featured: Ashley Pancho Wall Art
Natural Lighting
Finding the perfect lighting can be tricky when you haven’t got the lighting full setup. However, natural lighting is a great photography tip that can capture so many amazing things that studio lighting can’t. The best time to shoot with natural lighting are during soft daylight hours, bright days with partial cloud cover, or when using a sheer curtain to tone down harsh lights. Rather than using harsh studio lights that can make your photo look cold and boring, natural lighting easily captures colors in their true form!
Editing
When you’re struggling to get good lighting in your photos, editing them might be your only option. Brightening your photo’s exposure is a simple way to instantly improve an image and help it look light, airy, and Instagram-worthy. If you weren’t able to capture your room in natural lighting, color correct to remove yellow or blue hues or any harsh shadows.
Lightroom is a free iphone app that we recommend for correcting overall lighting and color correction. Brightening the photos exposure is a simple way to instantly improve an image.
-Digital Design Team at HM
2. Avoid Negative Space
Taking a photo of a room is simple but knowing what pieces to include is the kicker. For interior design photography, try to focus your camera on a few items as opposed to the entire room. This will eliminate wasted space and draw the eye to key elements. Allow for breathing room around important pieces to give your audience an idea of what you want to highlight. If you’re struggling for space in your shot, consider taking away items you don’t need or repositioning furniture.
3. Think About Angles
Products Featured: Artists Guild Centair Side Chair
The Focal Area
Distinguish what you want as your focal point and work your way from there. Once your key element is identified, ask yourself what you want. Wider shots are popular for interior design photos to help capture the key elements. Remember, the focal point is your main element and should stand out above everything else.
Move Yourself or Items for a Better Perspective
Lack of space can be a big obstacle when shooting photos in small rooms or apartments. Shuffle into the doorway or onto the patio for a wider perspective or move things around when needed. Another photography tip is to keep doors closed and remove clutter that doesn’t belong or could distract from the beauty of your image.
Get Low & Aim High
The secret to an Instagram-worthy photo is to mimic the level of your furniture with your lens. Rather than looking down at elements, which creates a dominant and over-powering profile, get low and aim high. Lower the camera to your focal point for a more dramatic and “lived-in” shot.
Furniture is typically lower than eye level. Lowering the camera will avoid furniture looking distorted, awkward or not true to size. Shooting from the hip gives any sofa a plush appearance compared to shooting high.
-Digital Design Team at HM
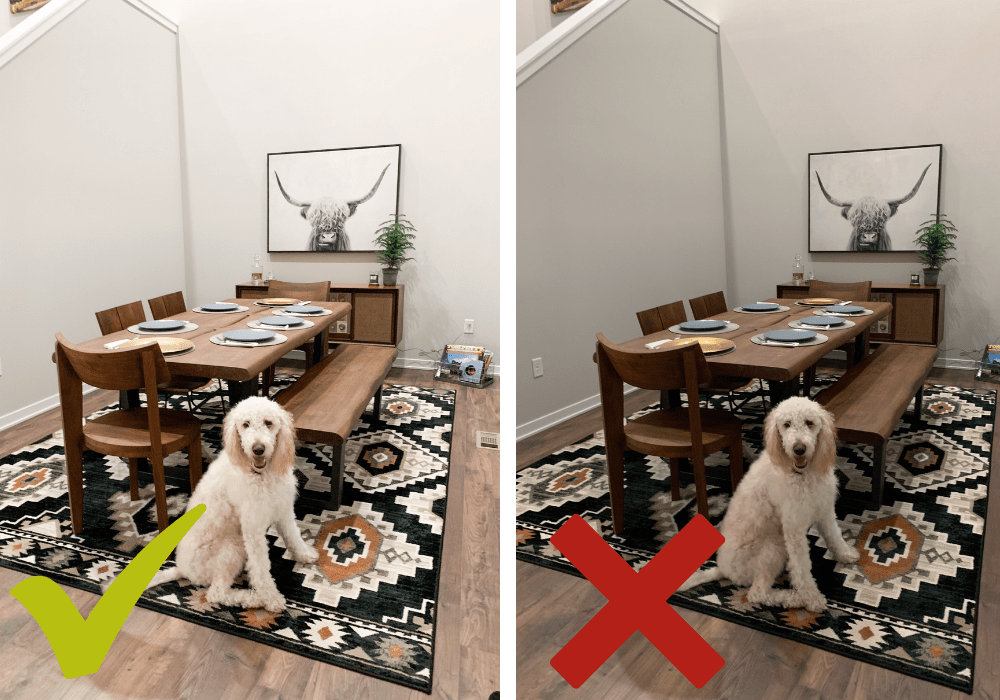
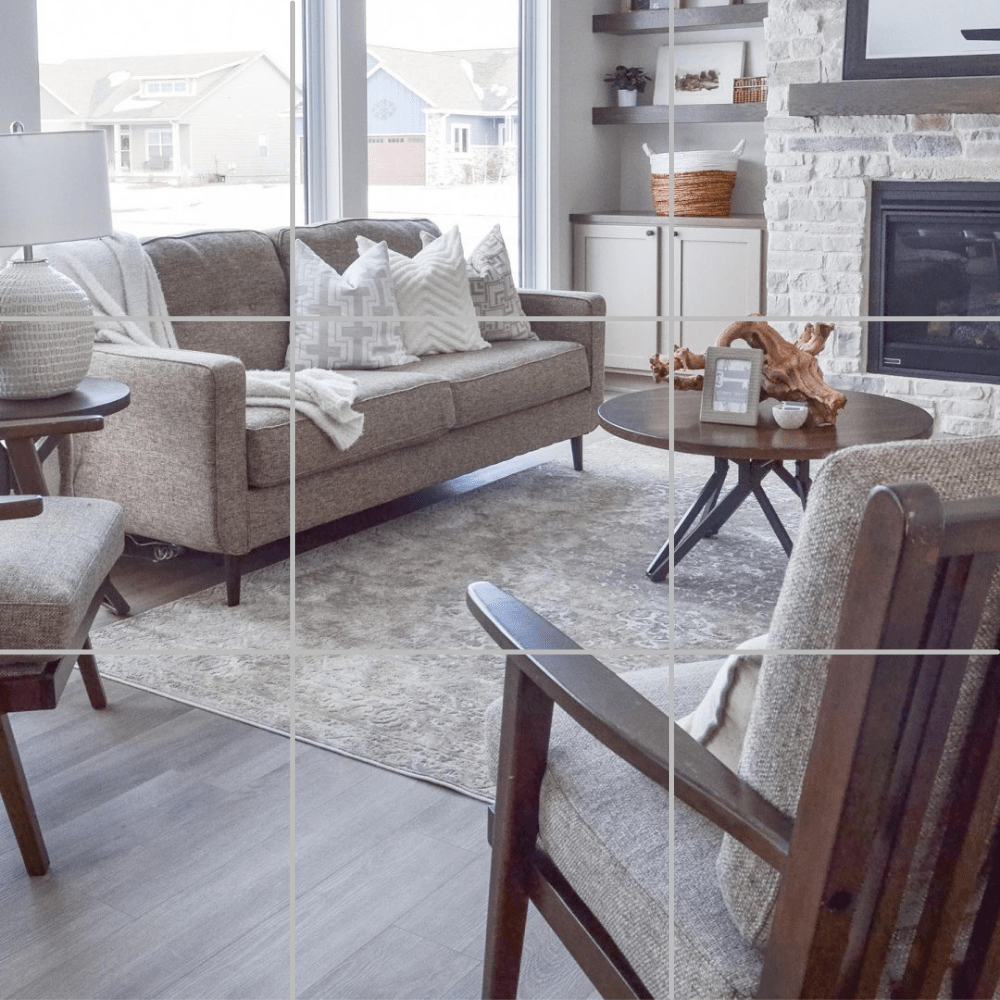
4. Use the Rule of Thirds
When shooting your subject (couch, dog, table, etc.), don’t shoot them straight on or in the center of your frame. Instead, position your key elements in the left, right, top, or bottom third of the frame. This creates a more pleasing and natural image! Whether you’re shooting your image horizontally or vertically, consider using the rule of thirds when choosing a position.
Use your “Grids”
Not great at eye-balling room shots? Don’t fret! On your iPhone, go to Settings > Photos & Camera > Grid to pull up the “grids” on your camera. Now, when you open your camera you’ll see nine sections that will help visualize and position important elements that may be off-center. They are also great for lining up vertical objects in a room such as walls, doors, or picture frames.
Product Featured: Ashley Dahra Sofa
5. Get Creative

Add a human, child or pet
Sometimes adding movement or dimension can help a photo. It doesn't have to be a child standing still and smiling. They can be running around being chased by the dog. You can have the back of their heads, or their feet. This will add interest to the photo with, honestly, minimal effort.
Add humans, children or pets into your photos and videdso to create more dimension and movement in your content.
-Social Team at HM
Pro Tip: Take Transformation Pictures
Product Featured: Jonathan Louis Kelsey Estate Sofa
Who doesn’t love a transformation? Taking a “before” and “after” image of your space help to visualize the progress of your home style. The “before” picture can help you identify where you need more light, where exactly you need to put wall décor, and where your focal point is, before decorating. The “after” picture brings the room to life and shows your process.
We love using instagram photos and reels to showcase different products. A great way to do this is through transitions, stop motion videos or styling videos.
-Social Team at HM
Now you try! Make sure to tag us @shophomemakers. We'd love to see your beautiful houses through your lens.
Related Articles

Old Money Aesthetics Inside And Out
The Old Money Guide to Entertaining: Timeless Style, Indoors and Out

Gather Around The Fire
Firepits: Gather Around The Fire

Welcoming Entryways and Mudrooms
Entryways and Mudrooms: The Rooms That Do All the Work While Still Looking Good

Weather Resistant Furniture